Eggless Checkerboard Cake
Want to bake a novelty cake for a special occasion? Don't have much time? You are not artsy enough to bake/decorate something beautiful? No worries. Try this egg free checkerboard cake recipe and wow your guests!
Ingredients
- 3 packets white cake mix I used Betty Crocker white cake mix (18.25oz)
- ¾ cup pureed silken tofu
- ¾ cup plain yogurt
- 1 cup oil any oil of your choice
- 3 and ¾ cups milk or water, I used 2%
- 3 teaspoons vanilla extract
- A few drops Red and pink food colors
Buttercream Frosting
- 1 and ½ cups unsalted butter
- 4 cups confectioner’s sugar (can to increase it upto 5 cups)
- 1 teaspoon vanilla extract
- A few drops pink food color
Instructions
- Set out 3 large bowls. Empty each cake mix into each bowl and make a well
- Let's prepare the cake batter for the first layer. To the first bowl of cake mix add, ¼ cup of pureed silken tofu, ¼ cup of yogurt, ⅓rd of a cup of oil, 1 teaspoon vanilla extract, 1 and ¼ of milk. Beat well with electric hand held beater. The batter should be smooth. Now we have the cake batter ready for one layer of cake.
- Repeat the above for the remaining 2 packets of cake mix too.
- To the first bowl of cake batter add few drops of pink color and beat well. Add more food color if needed. Wash the beaters and then repeat the same for the 2nd color.
- To the second bowl of cake batter add few drops of red color and beat well with clean beaters so that the pink color from the first bowl doesn't mix with this red color. Use red gel paste if you want to get nice red color batter.
- The third bowl of cake batter will be left white.
- Now follow the instructions given with the checkerboard pan set to fill the batter. As always line the pans with parchment paper and fill it ⅔rds full of batter. Use a ladle/spoon to fill in the batter because the dividers that come with the pan are tricky to be filled with the batter.
- The remaining batter was enough to make 24 mini cupcakes.
- Preheat the oven at 350F/180C.
- I placed 2 pans on the top rack and the 3rd on the middle rack. Halfway through the baking brought the top shelf ones to the middle and the middle one to the top, so that the cakes would bake evenly. It was quite tricky to move it. Use a good oven mitt in both hands and be careful.
- Bake it for about 25-35 minutes or until a toothpick inserted in the middle of the pan comes out clean and also watch out for the cake pulling off from the sides of the pan. Mine was ready in about 32 minutes.
- Baking time for the cupcakes would be around 12 minutes.
- Remove the pans from the oven and place it on wire racks to cool completely.
- After about 10-15 minutes remove the cake out of the pan and let it cool completely before you can frost.
Frosting:
- In a large bowl beat together the butter, icing sugar, vanilla extract and few drops of pink food color and a teaspoon or more milk if needed, to get a spreadable consistency. Start with 4 cups of sugar and gradually increase it if needed.
- Level the cakes to cut off the dome. Then proceed to frost each layer as usual and cover it up with the frosting.
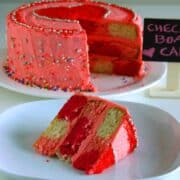
- Decorate the cake as you please. This time I got the idea of using a big heart shaped cookie cutter in the middle of the top layer of the cake and fill it with red sprinkles and line it with edible silver balls. That's what I did and it looked all pretty and Valentine's Day themed.
Notes
- You can also choose to use vegan buttercream frosting or vegan cream cheese frosting for this cake recipe.
- I have not calculated the nutritional information for this cake recipe because it's tricky because we are not using the entire cake mix packets to bake the 3 layers. Also there is batter leftover after baking the 3 layers. The remaining batter yields about 2 dozen mini cupcakes.
